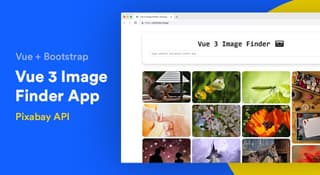
Creating Vue.js 3 Image Finder Web App Using Pixabay API

Vue.js 2 was really good. It is easier to create web applications with its option API. I already created a tutorial on How to create a Vue.js 2 Image searching web app using Pixabay. Now we are going to translate the same into Vue.js 3. So let's get ready for some Vue 3 magic ?
What's new in vue.js 3?
Vue 3 is a milestone in modern front-end web technologies. Vue 3 makes it easier to create a maintainable, modularized app with no extra effort. The Virtual DOM has been re-written from the ground up in Vue 3 which results in faster rendering. Vue 2 library is only *24 kb in size but In Vue 3 you can make it even smaller with the composition API. Vue 3 also allows you to import only those functions of it which you need in your application. So there will be no unnecessary JS code in the production build.
Breaking Changes ?
Vue.js 3 comes with a lot of changes that differentiate it from its predecessor. It's not possible to go through all the changes in a tutorial. So I recommend you to read the Vue.js 3 Changelog.
Enough talking now let's jump into the fun part ?
Creating the application
There are a few steps we need to take before creating an application, we need to create a Pixabay account and make sure to have the API Key.
To create a Pixabay account and get an API key please follow the mentioned steps.
Create Pixabay Account
- Go to Pixabay.com
- Signup or Login using your Email or Google Account
- Go to Pixabay API page
- Click on Get Started
- Copy Your API key in a Text file
Now we have everything we need to create an Image Searching Application. It’s time to start coding ??
Step 1: Create Project Skeleton
Step 1.1 Open Your Code Editor and Create index.html file and paste the skeleton code
<!DOCTYPE html>
<html lang="en">
  <head>
    <meta charset="UTF-8" />
    <meta http-equiv="X-UA-Compatible" content="IE=edge" />
    <meta name="viewport" content="width=device-width, initial-scale=1.0" />
    <title>Vue3 Image Search</title>
    <!-- CSS only -->
    <link
      href="https://cdn.jsdelivr.net/npm/bootstrap@5.0.1/dist/css/bootstrap.min.css"
      rel="stylesheet"
      integrity="sha384-+0n0xVW2eSR5OomGNYDnhzAbDsOXxcvSN1TPprVMTNDbiYZCxYbOOl7+AMvyTG2x"
      crossorigin="anonymous"
    />
    <style>
      .rounded {
        border-radius: 1rem !important;
      }
      .grid-container {
        column-count: 4;
        column-gap: 10px;
      }
      img {
        max-width: 100%;
        display: block;
      }

      .grid-container--item {
        margin: 0;
        display: grid;
        grid-template-rows: 1fr auto;
        margin-bottom: 10px;
        break-inside: avoid;
      }

      .grid-container--item > img {
        grid-row: 1 / -1;
        grid-column: 1;
      }
    </style>
  </head>
  <body class="font-monospace">
    <div id="app" class="container my-5"></div>
    <!-- Vue 3 library CDN -->
    <script src="https://unpkg.com/vue@next"></script>
    <script src="https://unpkg.com/axios/dist/axios.min.js"></script>
    <script src="./app.js"></script>
  </body>
</html>
In the above code, we have created a simple skeleton for our gallery web apps. Let me break it down for you. First, we have added the Vue JS 3 library using CDN. We have also added Bootstrap 5 Library which is a Pre Design component for Vue.js. It provides all the tools necessary to create beautiful content-rich applications.
Next, we have added the Axios library which is used to make HTTP requests. After that, we have included our very own app.js file. Please make sure you created the app.js file in the same directory.
Step 1.2 Create or Open app.js file and add the code
const app = Vue.createApp({
  data() {
    return {
      api: "https://pixabay.com/api/?key=YOUR_API_KEY",
      images: null,
      loading: false,
    };
  },
  // Vue Js Lifecycle hook: Get invoked when app is loaded
  mounted() {
    this.getImages();
  },
  methods: {
    // getImages Function
    // searchImage Function
  },
});

// Mounting the app to id #app
app.mount("#app");
In the above code, we have initialized Vue.js also we have created the required data properties 'api' and 'image'. Make sure to change the API key data property with your own API key provided by Pixabay.
Step 2: Getting Images from Pixabay API
Let's Create a Vue JS method to Get the Images from Pixabay API.
getImages(key) {
   // If key has value then store it to query otherwise store an empty string
   const query = key ? `&q=${key}` : ``;
   // Sets loading value to true
   this.loading = true;
   // Making request to the REST API
    axios.get(this.api + query)
         .then((response) => {
          // Assigning server response data to images
          this.images = response.data.hits;
        })
        .catch((error) => console.log(error))
        .finally(() => {
          // Once the process is done sets the loading to false
          this.loading = false;
        });
    },
Inside getImages Method, we are making an HTTP request to pixabay API and storing the response to images data property. Now we have to call getImages() method inside mounted.
mounted() {
 this.getImages();
},
Step 3: Showing Images in Page
Now Go back to index.html file. We will loop through the images object that we have stored in the previous step.
<header class="rounded border shadow text-center p-5">
<h1 class="display-5 fw-bold">Vue 3 Image Finder ?</h1>
<div class="w-80 mx-auto mt-3">
<div class="input-group rounded">
<input
type="search"
class="form-control"
placeholder="type anythin and press return key"
@keyup.enter="searchImage"
/>
<span class="input-group-text">?</span>
</div>
</div>
</header>
<main class="mt-5">
<!-- This section will be visible when loading is set to true -->
<div v-if="loading" class="mt-5 text-center">
<h2>??Searching image for you .....</h2>
</div>
<!-- This section will be visible when loading is set to false -->
<div v-else class="grid-container">
<div
v-for="(image, i) in images"
:key="i"
class="grid-container--item rounded overflow-hidden"
>
<img :src="image.webformatURL" class="w-100" />
</div>
</div>
</main>
In the above code we have used masonry card layout and Looping through the items.
Step 4: The Search Functionality
Add another Function inside methods object
searchImage(event) {
   // Assigns the input value to searchKey variable
   const searchKey = event.target.value;
   // If searchKey is empty then do nothing
   if (!searchKey && searchKey == "") return;
   // Else make the REST API call with searchKey
   this.getImages(searchKey);
},
In the serachImage function, we are making an HTTP request using our searchKey query and Replacing our Image data property with the response of the HTTP request.
Congratulation ? you have successfully created a Vue 3 application.